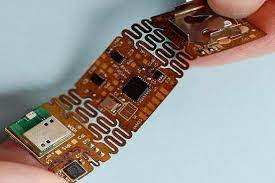
Flexible PCBs Are Assembled
A flexible pcb (flex PCB) is a printed circuit board that is manufactured on flexible materials to allow it to bend, twist and conform to the physical shape of the devices or systems it is installed in. The process starts with a Gerber file to create layers of film and drilling files, which are then cut into base material by lasers and drilled by drill machines. The next steps include etching, plating, solder mask printing, surface finish and E-testing.
Since flex PCBs are much more delicate than regular PCBs, they must be handled carefully and with great care to avoid damage during the manufacturing process. This requires proper design planning and careful workmanship throughout the assembly process to ensure that the resulting product is reliable and functional.
The first step in assembling a flexible PCB is visual inspection. This is performed by highly experienced technicians and is intended to catch any major defects like visible damage, misplaced components or soldering problems. This is important as faulty flex PCBs can be difficult to repair or replace after reflow soldering.
Once the initial visual inspection is complete, the flex PCB is moved to the reflow soldering station where it is heated with forced thermal convection infrared (RTI). This type of soldering is less likely to damage or stress the board than other types of soldering. In addition, RTI uses a low temperature profile to reduce the peak temperature on the board and keep the copper within its safe working range.
How Flexible PCBs Are Assembled
In order to prevent the flex PCB from warping during reflow soldering, stiffeners or rigidizers are usually used. These are temporary and will be removed once the flex circuit is ready for its final bending and flexing. In addition, a protective coating is often applied to the finished flex PCB to provide environmental protection and mechanical support. The coating can be made from acrylic, epoxy or silicone and comes in a variety of colors and thicknesses.
For a double sided flexible pcb, the components are attached using one of several methods: surface mount adhesive placement – A syringe or needle dispenses liquid adhesive on to the PCB and the component is placed on top. The adhesive is then cured with heat or UV.
Another method is to use a screen printer to apply the component to the bare board with preapplied adhesive. This is especially useful for a large number of small parts, such as LEDs and diodes. Lastly, some components may be attached with threaded fasteners.
After all of the components have been placed, the flex circuit is inspected again to make sure that there are no missing or incorrectly placed components. Once the flex circuit is deemed to be ready, it is packaged and shipped for delivery. This entire process is much more involved than putting together a traditional hard-rigid PCB and requires careful planning and workmanship to produce high quality, reliable products. However, it is worth the investment to ensure that your customers have a reliable product for years to come.